A 20-pound turkey feeds roughly 14 to 20 people, which means you’re probably cooking for a crowd. And that pressure? It’s real. Nobody wants to slice into a bird that’s raw in the middle or so dry it needs a gravy rescue mission.
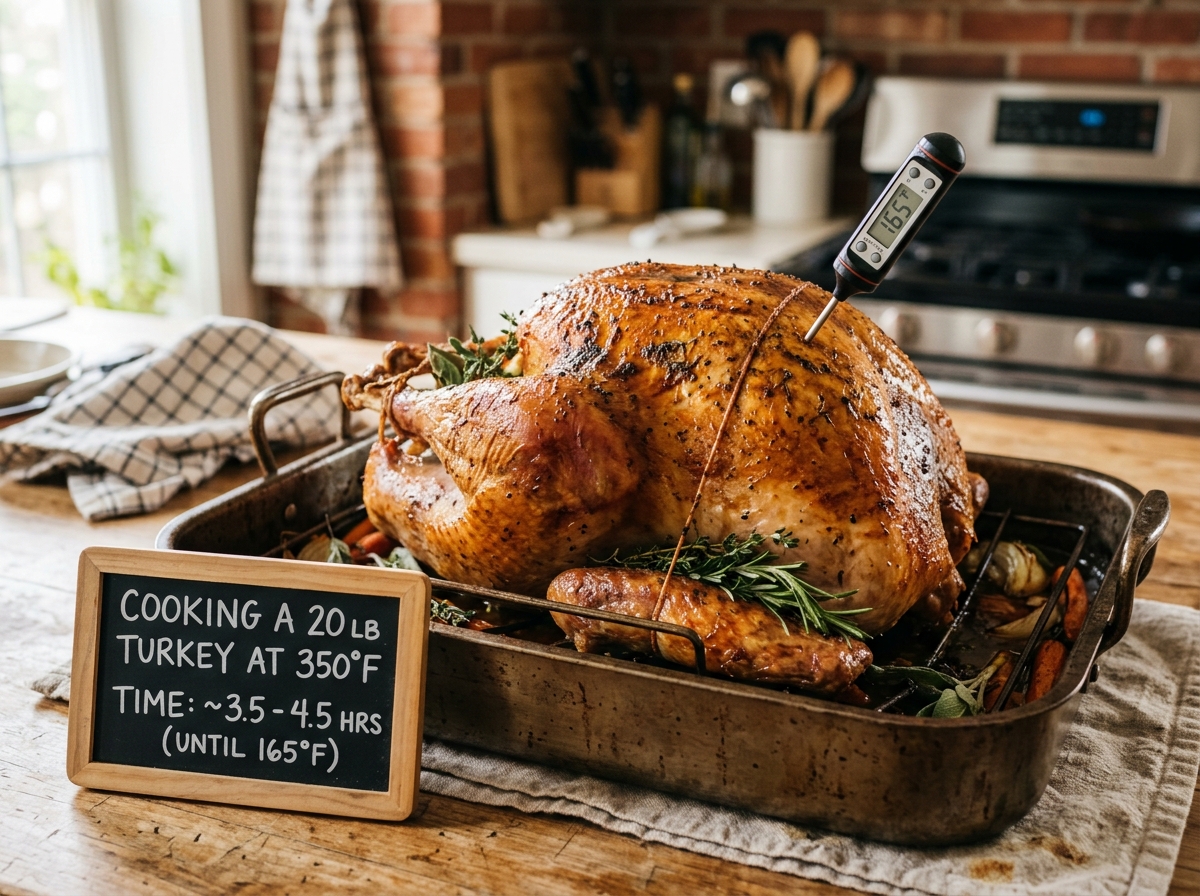
Here’s the short answer: an unstuffed 20-pound turkey takes about 4 to 4.5 hours at 350°F. If it’s stuffed, you’re looking at 4.5 to 5 hours, sometimes a bit more.
But cooking turkey isn’t just about setting a timer and hoping for the best. There are factors that affect your cook time — and knowing them makes the difference between a turkey you’re proud of and one you’re making excuses for.
Let’s break this down so you can plan your meal with confidence.
The Basic Math: Turkey Cook Time Per Pound at 350°F
At 350°F, the general rule is 13 to 15 minutes per pound for an unstuffed turkey. For a stuffed turkey, bump that up to 15 to 17 minutes per pound.
So for your 20-pound bird:
Unstuffed: 20 lbs × 13-15 min = 260 to 300 minutes, or roughly 4 hours 20 minutes to 5 hours
Stuffed: 20 lbs × 15-17 min = 300 to 340 minutes, or roughly 5 to 5.5 hours
Now, these numbers come from USDA guidelines, and they’re reliable starting points. But your specific turkey, your specific oven, and a few other variables can shift things by 30 minutes or more in either direction.
The single most important thing? Use a meat thermometer. Seriously. It’s the only way to know for sure when your turkey is done. More on that in a minute.
Why 350°F Works (And When It Doesn’t)
You might wonder why 350°F is such a popular temperature for turkey. It’s actually a sweet spot that balances a few competing needs.
At 350°F, you get:
- Even cooking from outside to inside
- Enough time for the skin to render and crisp
- Lower risk of the breast drying out before the thighs are done
- Forgiving timing (a few minutes either way won’t ruin it)
Higher temperatures (like 400-425°F) cook faster but increase the risk of burnt skin and uneven doneness. Lower temperatures (like 325°F) are safer for beginners but add 30-45 minutes to your total time.
Some cooks use a combination method — starting high to crisp the skin, then lowering to 350°F for the bulk of cooking. It works, but adds complexity. If you’re stressed about timing or it’s your first big turkey, sticking with a steady 350°F keeps things simple.
Stuffed vs Unstuffed: It’s More Than Just Time
The stuffing-inside-the-turkey debate has been going on for decades. Here’s what you need to know from a cooking time perspective.
Unstuffed turkeys cook faster because hot air can circulate through the cavity. The internal parts of the bird heat up quicker, and you have fewer food safety concerns.
Stuffed turkeys take longer because the stuffing acts as insulation. The center of that stuffing needs to reach 165°F just like the meat does — and getting heat to the middle of a dense bread mixture takes time.
Pro Tip: If you’re stuffing your turkey, don’t pack it too tightly. Loose stuffing allows better heat circulation and more even cooking. Also, the stuffing should go in just before roasting — never the night before. Bacteria love that warm, moist environment.
A 20-pound stuffed turkey can take nearly an hour longer than unstuffed. Plan accordingly, especially if you have a fixed dinner time.
Your Turkey’s Internal Temperature Matters Most
Forget what your grandmother said about wiggling the leg or waiting for the pop-up timer. Those methods are unreliable, and pop-up timers are often set too high, which means overcooked meat.
The magic number is 165°F in the thickest part of the thigh, measured with an instant-read thermometer. That’s the safe internal temperature recommended by the USDA.
Here’s where to check:
- Insert the thermometer into the thickest part of the thigh
- Make sure it’s not touching bone (bones conduct heat differently and give false readings)
- Also check the thickest part of the breast
- If stuffed, check the center of the stuffing too
Did You Know? Turkey continues cooking after you remove it from the oven. This is called carryover cooking. The internal temp can rise another 5-10°F during resting. So pulling your turkey at 160-162°F in the breast is actually smart — it’ll coast up to 165°F while resting.
Creating Your Cooking Timeline (Backwards Planning)
Here’s something most recipes don’t tell you: planning backwards from your serving time is the smartest approach.
Let’s say you want to serve turkey at 4:00 PM.
Work backwards:
- Serving time: 4:00 PM
- Carving time: 3:45 PM (you need 15 minutes to carve)
- Resting time: Needs at least 30 minutes, ideally 45 (so turkey should come out around 3:00 PM)
- Cooking time: About 4.5 hours for a 20-lb unstuffed turkey
- Oven start time: 10:30 AM
- Prep time: Allow 30 minutes for trussing, seasoning, bringing to room temp
- Prep start: 10:00 AM
If your turkey is stuffed, push everything back by about 45 minutes to an hour.
Buffer time matters. Turkeys often finish earlier or later than expected. If your turkey finishes 30-45 minutes early, that’s fine — it can rest longer (just tent it loosely with foil). But if you’re running late, you can’t speed up cooking without risking uneven results.
Better to plan for the turkey to be done a bit early than to have hungry guests staring at a still-cooking bird.
The Resting Period (Don’t Skip This)
Resting might feel like wasted time when everyone’s hungry, but it’s actually where the magic happens.
When turkey cooks, the juices move toward the center. If you cut into it immediately, those juices pour out onto your cutting board instead of staying in the meat. Resting lets the juices redistribute throughout the bird, giving you moist meat in every slice.
For a 20-pound turkey, rest for at least 30 to 45 minutes. Big birds retain heat well, so don’t worry about it getting cold. Tent it loosely with aluminum foil — you don’t want to wrap it tightly, or the crispy skin will get soggy from steam.
Use this time to finish your gravy, mashed potatoes, or other sides. The resting period is built-in kitchen time for everything else.
Covered or Uncovered: What’s the Right Call?
This is one of the most common questions, and the answer is: both, at different times.
Start uncovered for the first hour or two. This allows the skin to dry out and begin browning. Crispy skin needs exposure to dry oven heat.
Cover with foil if the skin is browning too fast. If your turkey is getting dark and you’ve still got an hour or more to go, loosely tent the breast with foil. This prevents burning while allowing the bird to continue cooking.
Uncover again for the last 30-45 minutes if you want to crisp up the skin before serving.
The key is watching your specific turkey. Every oven runs a little differently, and your turkey’s shape and how it sits in the pan affects browning. Check on it every 45 minutes to an hour and adjust your foil strategy accordingly.
What If Things Don’t Go as Planned?
Let’s be honest — things rarely go exactly as planned when you’re cooking a big meal. Here’s how to handle the most common problems.
Turkey is done too early:
This is actually the better problem to have. Keep it warm by tenting with foil and placing a kitchen towel over the foil (adds insulation). A turkey can rest for up to an hour without getting cold, especially a big one. Just before serving, you can even put it back in a 200°F oven for 15 minutes to warm the exterior.
Turkey is taking too long:
First, check your oven temperature with an oven thermometer — many ovens run 25 degrees off from what the dial says. If you’re running behind, you can increase the temperature to 375°F for the final hour. Just watch for excessive browning and cover with foil if needed.
The breast is done but the thighs aren’t:
This is common because breast meat is leaner and cooks faster. Cover the breast with foil and continue cooking until the thighs reach temperature. For next time, consider a spatchcocked turkey or cooking breast-side down for part of the time.
The skin isn’t browning:
Make sure you dried the skin thoroughly before cooking. You can brush with butter or oil partway through. For the last 20 minutes, you can bump the oven to 400°F to encourage browning.
A Few Things That Affect Your Cook Time
Even if you follow the per-pound guidelines perfectly, these factors can shift your actual cooking time.
Oven calibration: Many home ovens run hot or cold by 15-25 degrees. An oven thermometer (they cost around $7) tells you what’s really going on in there.
Turkey temperature at start: A turkey straight from the fridge takes longer than one that’s sat out for an hour. Letting your turkey sit at room temperature for about an hour before cooking helps it cook more evenly — but don’t leave it out longer than 2 hours for food safety reasons.
Roasting pan depth and material: A shallow pan allows more heat circulation. Dark pans absorb more heat and can cook the bottom faster. A roasting rack lifts the turkey, allowing heat to reach the underside.
How often you open the oven: Every time you open the door, you lose 25-50 degrees of heat. The oven has to recover, which adds time. Check on your turkey, but don’t keep peeking every 15 minutes.
Convection vs conventional: If you’re using convection, your turkey will cook about 25% faster. Reduce either temperature by 25°F or reduce cooking time accordingly.
Preparation Steps That Make Cooking Easier
The actual roasting is almost the easy part. What you do before the turkey goes in the oven sets you up for success.
Thawing: A 20-pound turkey needs about 4-5 days to thaw in the refrigerator. Plan for 24 hours per 4-5 pounds. Never thaw on the counter — the outside reaches unsafe temperatures while the inside stays frozen.
Drying the skin: Pat the turkey dry with paper towels, inside and out. Wet skin steams instead of crisping. For extra crispy skin, let the uncovered turkey sit in the fridge overnight after patting dry.
Bringing to room temperature: Take the turkey out of the fridge about 1 hour before roasting. A cold turkey shocks when it hits the hot oven and cooks unevenly.
Seasoning: Salt the turkey generously, including inside the cavity. If possible, salt it 24 hours ahead and let it sit uncovered in the fridge. The salt penetrates the meat and the skin dries out — win-win.
Trussing (optional): Tying the legs together makes for a prettier presentation and slightly more even cooking, but it’s not strictly necessary. If you skip it, the thighs actually cook a bit faster because they’re more exposed to heat.
Simple Roasting Method for 20-Pound Turkey at 350°F
You don’t need a complicated recipe. Here’s a straightforward approach that works.
Step 1: Preheat your oven to 350°F. Position the rack in the lower third of the oven.
Step 2: Remove the turkey from the fridge about an hour before cooking. Remove the neck and giblets from the cavity (check both ends). Pat dry with paper towels.
Step 3: Season generously inside and out with salt and pepper. Rub softened butter or olive oil all over the skin. Add aromatics to the cavity if you like — quartered onion, celery stalks, fresh herbs, lemon halves.
Step 4: Place turkey breast-side up on a roasting rack set inside a roasting pan. Tuck the wing tips under the body to prevent burning.
Step 5: Roast uncovered for the first 2 hours. Check the browning — if the skin is getting too dark, tent loosely with foil.
Step 6: Continue roasting, checking every 45 minutes. Start checking internal temperature at the 3.5-hour mark.
Step 7: Turkey is done when the thickest part of the thigh reads 165°F and the juices run clear. For stuffed turkey, stuffing center should also reach 165°F.
Step 8: Transfer to a cutting board, tent loosely with foil, and rest for 30-45 minutes before carving.
FAQ Section
How long to cook a 20 lb turkey at 350°F if it’s frozen?
Don’t cook a frozen turkey. Seriously. It won’t cook evenly, the outside will overcook before the inside is safe to eat, and it’s a food safety risk. A 20-pound turkey needs 4-5 full days to thaw in the refrigerator. If you’re short on time, you can thaw in cold water (about 10 hours for a 20-pounder, changing water every 30 minutes), but fridge thawing is safest.
Should I baste my turkey while it’s cooking?
Basting is optional and mostly traditional. It doesn’t actually keep the meat moist — that’s a myth. The liquid runs off the skin, and opening the oven repeatedly lowers the temperature, potentially adding cooking time. If you enjoy the ritual or want to add flavor to the skin, baste once or twice max. Otherwise, skip it.
Can I cook a 20-pound turkey at 325°F instead of 350°F?
Yes, 325°F is actually the USDA’s recommended temperature. It’s more forgiving and reduces the risk of the outside overcooking. At 325°F, expect a 20-pound unstuffed turkey to take about 4.5 to 5 hours. Stuffed, it could take 5 to 5.5 hours or slightly more.
What’s the minimum safe internal temperature for turkey?
165°F, measured in the thickest part of the thigh without touching bone. This temperature kills harmful bacteria like salmonella. If you’ve stuffed your turkey, the center of the stuffing also needs to reach 165°F.
Why is my turkey cooking faster or slower than expected?
Several factors affect cook time: your oven’s actual temperature (vs what the dial says), whether the turkey was room temp or cold when it went in, the pan type, whether you’re using convection, and how often you open the oven door. An oven thermometer helps identify if your oven runs hot or cold.
Final Thoughts
Cooking a 20-pound turkey at 350°F isn’t complicated once you understand the basics. Budget 4 to 4.5 hours for unstuffed, 4.5 to 5 hours for stuffed, and always verify doneness with a meat thermometer reading 165°F in the thigh.
Build in extra time for resting — at least 30 to 45 minutes — and plan backwards from when you want to serve. If you’re nervous about timing, remember: a turkey that’s done a bit early is much easier to deal with than one that’s running late.
Your first big turkey might feel stressful, but it’s really just a large chicken that needs more patience. Trust your thermometer, give yourself buffer time, and you’ll be carving a beautiful bird while everyone wonders how you made it look so easy.